Pages

Showing posts with label dairy free. Show all posts

Monday, August 11, 2014

Citrus Chard Juice


Makes about 3 cups (24 oz)

Ingredients
  • 1 carrot
  • 1 lime (peeled)
  • big bunch of Swiss chard (enough to fill a large bowl)
  • 2 apples (cored)
  • 1/2 tsp ground fresh ginger (not the dry spice) (or 1" piece of ginger root)
  • 1 medium cucumber

Directions


Add all ingredients to juicer, except ginger, unless using whole ginger root. If using the ground ginger, whisk it into the juice at the end.


Friday, July 25, 2014

Black Bean Hummus

Makes about 2.5 cups


Ingredients

1 can black beans, rinsed, drained
1 can garbanzo beans, rinsed, drained, skins removed
¼ tsp reduced sodium salt
¼ tsp black pepper
1 tsp cumin
½ tsp oregano
small bunch of parsley (about ¼ cup coarsely chopped)
½ tsp onion powder
3 tsp minced garlic
pinch of smoked paprika
pinch of chili powder
¼ cup tahini
¼ cup + 1 tbsp lemon juice
2 tbsp extra virgin olive oil

Directions

Puree all ingredients in a food processor, about 5 min or until desired consistency.

Sweet Potato Hummus


ImageDesc
Sweet Potato Hummus

This. Is. So. Yummy. I could just eat this all by itself. I previously made a post about the hummus at Wegmans, and how delicious it was. Well, I found the perfect recipe for the sweet potato variation!


Makes about 3 cups


Ingredients:


  • 1 lb. (about 2 1/4 cups mashed) sweet potatoes, baked, without skin
    • (Place 3 medium sized sweet potatoes on baking sheet. Bake at 400 degrees for 50-60min or until a knife inserts easily when pierced. Let cool. Remove skins.)
  • 3 tbsp lemon juice (add 1 tbsp if you like it be more tangy)
  • 2 tbsp extra virgin olive oil
  • 1/4 tsp reduced sodium salt
  • 1/4 tsp ground black pepper
  • 1/2 tsp cinnamon
  • 1 tsp cumin
  • 1/4 cup tahini
  • 1 3/4 cups canned low-sodium chickpeas
  • 1 tsp minced garlic (1 clove)


Directions:

Easy as pie!
Add all ingredients to food processor...Process until super-smooth (about 5 min), periodically scraping the mixture down the sides if needed.

Thursday, July 24, 2014

Chocolate Banana SunNut Protein Bars with Coconut

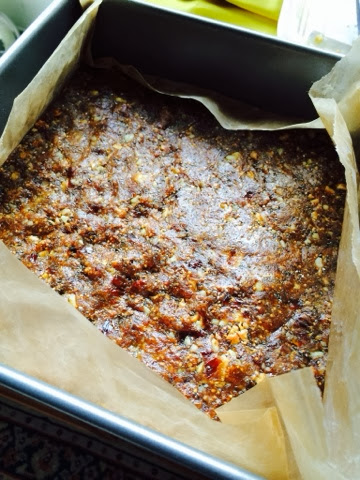
I had Phood Nutritional Shake powder to use up, so I conducted this culinary experiment! Although it didn't turn out as I wanted, I like them because they are soft, have only a hint of sweetness, are a little nutty, and I found them to be incredibly filling (and since they are pretty low-cal, this is good if you're trying to stick to a calorie budget while still feeling satisfied). So, considering they aren't so sweet, I think they are perfect as a snack or breakfast bar, because it doesn't make me want to devour them in mass quantity. Still, I would like to tweak the recipe for next time, because I think it could use maybe a little salt, or replace some of the flour with cocoa powder. 

Makes 12 squares/ bars

Ingredients
1 banana, mashed
3 cups oats (quick oats are fine, but if you want more texture, use rolled oats)
1/2 cup Sunbutter creamy sunflower seed butter
6 scoops Phood Chocolate Caramel Nutritional Shake powder
1 avocado, mashed (skin and pit removed)
3 large egg whites (Vegan substitute: 3 tbsp flax meal plus 1/2 cup+1 tbsp hot water)
1/2 cup sorghum flour
1 cup applesauce, unsweetened
3/4 cup finely grated carrot
1/2 cup unsweetened flaked coconut
3 tbsp sunflower seeds raw, hulled (optional topping)
vegetable or coconut oil

Directions
Preheat oven to 325 F. 
Lightly grease a 9x13 baking pan with oil.

Blend banana, avocado, applesauce, egg whites, and sunflower seed butter together in a large bowl. 
Add in the remaining ingredients. Mix thoroughly. Spread mixture evenly into baking pan (it may help to wet a spatula to spread it more easily). Sprinkle sunflower seeds on top, if using. 

Bake for 30 min, or until knife inserted into center comes out clean with just a few crumbs (it will still be moist). Place the pan on a cooling rack until cool. Cut into 12 squares. 

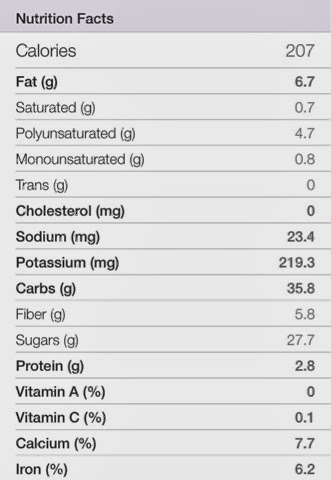
Nutritional Info (via MyFitnessPal) per serving:
286 kcal, Tot. Fat 13 g (3 g sat. fat, 4 g MUFA, 3 g PUFA), Chol. 0 mg, Sodium 143 mg, Potassium 296 mg, Carbs 32 g (Fiber 7 g, Sugars 4 g), Protein 13 g


Thursday, June 26, 2014

Quinoa with Pine Nuts and Green Onions


Recipe found at  http://www.kalynskitchen.com/2011/03/recipe-for-quinoa-side-dish-with-pine.html?m=1

4 servings 

Ingredients

1 tbsp canola oil
1 cup quinoa, rinsed, well-drained (unless the package says it does not need to be rinsed)
1 3/4 cup chicken or vegetable stock
1/4 tsp. salt
1/2 cup toasted pine nuts (toast in a dry pan, until golden)
1/2 cup sliced green onion (about 3 scallions) (green and white parts)
2 tbsp finely chopped cilantro (or flat-leaf parsley)


Heat the oil in a medium pot over medium-high heat. Add quinoa and saute for 3-4 minutes, or until the quinoa is toasted. Microwave stock about 3 min. Add the hot stock and salt. Stir and bring the mixture to a boil, then lower heat to a simmer and let the quinoa cook covered for 15 to 20 minutes (until the liquid is absorbed). If the quinoa is cooked, but still somewhat 'wet', turn up the heat to medium to dry it out more.

While quinoa cooks, toast the pine nuts in a dry frying pan over medium heat, until golden, about 2-3 min (shake pan a few times to toast evenly and avoid burning). Prepare onions and cilantro. 

When quinoa is done, let stand covered for 5 minutes. Fluff quinoa with a fork and Stir in pine nuts, green onions, and  cilantro.  Serve hot or warm.

Ginger Lime Mango Sorbet

A creamy, fruity, tangy, refreshing treat, that is easily scoopable and not icy!

Adapted from 
http://www.seriouseats.com/recipes/2013/04/mango-sorbet-recipe.html

Makes 2 qts

Special equipment needed:
2-qt ice cream machine

6 mangoes, peeled, pitted, cubed (about 7 cups)
1/4 cup lime juice
1/4 cup orangecello (or you could use orange liqueur)
1/2 cup sugar
1/2 tsp coconut extract
1 tsp ground ginger

Purée ingredients in food processor or blender. 
Strain mixture through fine mesh sieve. Chill strained mixture in fridge for 30 min to an hour. Discard the remaining substance. 
Add chilled mixture to ice cream maker according to manufacturer's instructions. I used a Cuisinart Ice Cream machine that takes about 20 minutes until the mixture is well-thickened. For this recipe, I needed to run the machine for 25 min. 
Scoop into a freezer safe container. It should 'ripen' or fully firm up in about 6-8 hours. 

Roasted Tequila Lime Chicken


Original recipe found at http://smittenkitchen.com/blog/2007/04/chicken-jealousy/
Original source: Ina Garten, Barefoot Contessa

In this recipe I doubled nearly everything from the orginal to make sure the chicken would be fully coated...but this might not be necessary. 

Ingredients

1 cup gold tequila
12 oz 100% lime juice
1 cup freshly squeezed orange juice
2 tbsp chili powder
2 tbsp minced jalapeno pepper (I used jarred sliced jalapeños and just squished them up in my hands)
2 tbsp minced fresh garlic
1 tbsp salt
2 tsp  freshly ground black pepper

Original: 3 whole boneless chicken breasts 
Adapted: 1 - 4 lb roasting chicken, quartered 
Olive oil

3 tbsp Fresh Cilantro, finely chopped 

Combine the tequila, lime juice, orange juice, chili powder, jalapeno pepper, garlic, salt, and pepper in a large container. Add the chicken. Refrigerate and let marinate for 8 hours or overnight.

Original: "Heat a grill with coals and brush the rack with oil to prevent the chicken from sticking. Remove the chicken breasts from the marinade, sprinkle well with salt and pepper, and grill them skin-side down for about 5 minutes, until nicely browned. Turn the chicken and cook for another 10 minutes, until just cooked through. Remove from the grill to a plate. Cover tightly and allow to rest for 5 minutes. Serve hot or at room temperature." 

Adaptation: (Used whole bone-in chicken breasts (chicken halves) with 6 drumsticks, with skin) 
Place Skin side up in baking dish. Brushed with olive oil. 
Preheat oven to 450.(Roast setting)
Bake for 40 min.
Tent with foil after about 15 min or when the skin is nicely browned. 
Cover with foil for 15 min after removing from oven, before serving. Internal temp must reach 165 (can take out at 160) to be done.

Sprinkle with cilantro to serve. Serve hot! 

Tuesday, June 17, 2014

Oatmeal Cookies with No-added Sugar

If there ever was a 'healthy' cookie, this one might fit the bill...
No added sugar, just the natural sweetness of dates, raisins, and bananas. Rolled oats, flaked coconut, ground flaxseed, cashews, and defatted powdered peanut butter, add some healthy fats, protein, and fiber. 


This was an experiment really, so I wasn't sure how it would turn out. But, I think they turned out pretty great for something I just threw together (that's why I had to estimate quantities in the recipe).

Makes 26 cookies.

Ingredients
1/4 cup raisin paste (about 1/4-1/3 cup packed raisins, processed into a paste/purée  another good idea might be to boil and soak the raisins to soften them, and then puree them. You could just use more dates and puree those, but raisins are cheaper!)
2 1/2 cups rolled oats (not instant)
3/4 cup chopped pitted dates
1/3 cup unsweetened coconut flakes
1/3 cup (P2B) defatted, powdered peanut butter
3/4 cup roasted, salted cashews
1-2 tsp cinnamon
1 very ripe banana
1 tsp baking powder

Directions

Preheat oven to 350. Line baking sheet with parchment.
Pulse/ process banana, raisins, cinnamon, baking powder, peanut butter powder, coconut flakes, dates, until fine/smooth. Add cashews and pulse until pieces are small to medium sized.

Add mixture to a bowl and stir in oats until well mixed together.
Form 1.5" sized balls and place onto baking sheet. Flatten slightly.

Bake for 15 min until cookies are golden brown on edges. Remove cookies from pan and let cool on wire rack.  


Friday, May 23, 2014

Coconut Lime "Tarabars"

I love Larabars, but I wanted to find a way to make them myself to save $$, and to devise my own favorite flavor combos! 

These are made much like the Figgy Walnut Bars I posted previously, but I was going for a 'key lime' kind of flavor. I think it came together pretty great, and I hope you do too! 

So without further ado...

Makes 12 'Tarabars' :)

Ingredients
1/2 cup rolled oats
1 1/2 cups dried pineapple chunks
3/4 cup coconut flakes, unsweetened
1 cup whole almonds
1/2 tsp ground ginger
1/4 tsp coconut extract
1 tbsp lime juice (or to taste; zest might be even better)
2 tbsp ground flaxseed
1 tbsp coconut oil

1. Combine everything into a food processor. Process until it forms nice clumps, and holds together well. 


2. Line a 8x8 pan with plastic wrap with enough to wrap over the mixture. Press mixture evenly into pan. Wrap with plastic. Pop into fridge for 15 min (helps to firm it up, and make it easier to cut).

3. Cut into 12 bars.


Store these in a cool place (fridge is best for longer storage, and to keep them firmer), wrapped individually, or layer wax paper in between the bars to prevent them from sticking together. 
I think they should keep for several weeks if they are wrapped well, since it's just dried fruit & nuts. And the citric acid in the lime juice is a natural preservative too, so that can't hurt ;)


Tuesday, March 25, 2014

Baked Oatmeal

Directions are basically the same or similar for each variation...  Please see the instructions under "spiced pumpkin" version.

Spiced Pumpkin Coconut (for 4 ramekins)

3/4 cup canned pumpkin
1 tsp baking powder
1/2 tsp cinnamon
Dash of allspice
Dash of salt
2 tsp coconut cream
1 tsp vanilla extract 
2 egg whites
2 cups rolled oats
1 tbsp + 1 tsp coconut flakes (optional; divided among servings)
1/4 cup chopped walnuts (optional: can be mixed in or on top


Directions
Preheat oven to 375. 
Bake 20 min. 

These actually hold together well enough to pop out of the ramekins like little muffins. You could serve them with a little pat of butter (vegan for me), or a drizzle of maple syrup. 

Coconut-Craisin

1 tbsp coconut flakes, unsweetened 
1/2 tsp Truvia
1/2 cup rolled oats
1/4 cup pear or apple sauce
1 egg white
1/4 tsp baking powder
2 tbsp blueberry flavored craisins (or 1/4 cup blueberries)
Coconut oil (for greasing baking dish)
Optional Topping:
1 tbsp Maple syrup + 1 tbsp cashew butter + 1 tbsp soy milk


For the Original recipe, (and more variations) Go here! http://mmmmarleemar.wordpress.com/2014/03/13/apple-blueberry-baked-oatmeal/

Friday, March 7, 2014

Figgy Walnut Bars

Though these are quite similar to Larabars, the orange extract used in them makes them delightfully different from any of the available Larabar flavors. I made these based on a recipe from Whole Foods.
Dates and figs are naturally very sweet, so they are great for us folks with the occasional sweet tooth, but, as fruits, they are also healthy for you! (Certainly more nutritious than plain ol' table sugar! Blech).

Ingredients
10 oz medjool dates, pitted
10 oz Turkish figs (hard stem part removed)
1 cup walnuts
1/4 tsp orange extract
1 tsp vanilla extract
1 tsp cinnamon

In a food processor, combine all the ingredients. Process until you get a small crumb.

Remove half of the mixture. Set aside. 
Process the rest until it looks close to a paste, and sticks together easily. 
Now. Press it into a baking pan lined with wax paper. 
Once it's all smooshed evenly, cover it with plastic, and set in in the fridge to firm up, about 2 hours. Lift out with wax paper, and cut into bars. Wrap individually or separate with sheets of wax paper for storage. Keep refrigerated so they keep their shape. 

I'm sure there are many fruit/nut combos we all could come up with for these bars... So I look forward to using my own creativity and hopefully hearing from you about what you did too! 

Thursday, March 6, 2014

Cauliflower and Broccoli in Cashew Cream Red Curry Sauce

Spicy warning! (about as spicy as "medium" salsa)

This recipe is more of a side dish, but could be made into a main dish by adding a protein, like meat or beans (there are a few suggestions at the end of the recipe). 
If you would like to make this a main dish, you will probably want to double the sauce recipe, so there will be enough to cover everything well.

About 4 servings

Ingredients

  • 3 cups cauliflower florets
  • 3 cups broccoli florets

Curry-cream sauce:

*Red curry sauce (For the original recipe, go to About.com Thai Food)
  • 1/4 cup white onion, chopped
  • 3 Tbsp. prepared lemongrass 
  • 1/2 to 1 tsp. cayenne pepper
  • 4 cloves garlic
  • 1 thumb-size piece ginger, sliced
  • 2 Tbsp. tomato ketchup
  • 1 tsp. ground cumin
  • 3/4 tsp. ground coriander
  • 1/4 tsp. ground black pepper 
  • 2 tbsp tamari (or soy sauce, however, original recipe called for fish sauce)
  • 1 tsp. sugar
  • 1 tsp coconut liquid aminos (or use more soy sauce)
  • 1-1/2 to 2 Tbsp. chili powder (use less if you don't like it too spicy)
  • 3 Tbsp. thick coconut milk, or just enough to keep the blades turning (reserve remaining for cooking the curry)
  • 2 Tbsp. lime juice
  • 1/4 tsp. cinnamon
Directions

First, prepare red curry sauce. Chop, peel, grate, etc. ingredients as listed and add to a food processor. Process until smooth.


In a small bowl, mix together the equal amounts listed of prepared curry sauce and cashew cream. Set aside. 
Note: this ratio of sauce to nut cream can be adjusted to taste If you want it more spicy, add more curry sauce, if not, add more nut cream. Also, if the sauce is too thick, you can thin it out, adding a few tablespoons of coconut, soy, or almond milk at a time, until you reach the desired consistency.

Steam vegetables until tender.

Add the vegetables to a skillet, and toss with the prepared curry cream sauce, making sure everything is coated well. Heat over medium-high heat, stirring frequently, until the mixture is heated through. Serve hot, and enjoy!


Main dish add-in variations:

Meat-lovers:
  • Cooked and cubed chicken breast
Vegetarian:
  • 1 can (15 oz) rinsed, drained chickpeas


Easy Mushroom-Tomato Pasta Sauce


A super easy, tasty, accompaniment to your favorite pasta! 

Fresh whole wheat pappardelle with sauce

Ingredients 
1 large onion, diced (about 1-1/2 cups)
1-1/2 cups sliced mushrooms
1-1/2 cup diced plum tomatoes (remove pulp and seeds)
2 tbsp olive oil
Salt
Black pepper

Optional: 1/3 cup grated Parmesan cheese

Directions
If you are starting with whole mushrooms, very quickly rinse them under cold water to remove dirt (don't soak, because mushrooms easily absorb water and then you are left with yucky soggy mushrooms!); afterwards, gently dry them on a clean towel, and spread out to let dry further.

Heat oil in large non-reactive skillet (stainless steel preferably; don't use aluminum as the acids in the tomato can discolor and give an off flavor to the sauce ). 
Add mushrooms, and add a dash of salt. Stir to coat, and sauté over medium-high heat for about 4-5 min. Stir in onions, sprinkle another dash of salt in, and cook another 5 or so until onions are translucent. Add in tomatoes, add a sprinkle of salt and pepper, and cook about 4 min. Season to taste with salt and pepper to finish the sauce.  

If you are ok with cheese, you can stir in about 1/3 cup grated Parmesan at this point. 

Toss the sauce with cooked pasta and fresh parsley (you can reserve some to around on top or mix it all in). Now, dig in!

Italian Turkey Meatloaf


Ingredients
1-1/2 pounds 93/7 lean ground turkey
1 egg 
1/2 cup coarse ground rolled oats (or steel cut oats)
1/4 cup sweet vermouth
2 tbsp olive oil
4 oz basil pesto (dairy free)
4 large cloves garlic, minced
1/2 cup sun dried tomatoes, chopped
1-1/4 cups tomato sauce (could use canned crushed tomatoes, with 1/2 cup liquid reserved)
1/4 cup tomato paste
Small handful of Fresh, chopped parsley
1/2 tsp fresh ground black peppercorns
1 tsp onion powder
1 cup diced onion
2 tsp oregano
2 tsp basil
1 tsp Salt

Directions
Preheat oven to 375°F. 

Heat oil in skillet. Sauté onions for several minutes: add vermouth. Sprinkle a little salt. Cook several min. Until onions are tender and liquid is mostly cooked out. Add garlic and cook for another couple minutes.

In a medium bowl, combine ground meat, egg, oats, cooked onion mixture, pesto, half of chopped parsley, sun dried tomatoes.

In small bowl, mix together tomato sauce, paste, herbs & spices. Add 3/4 cup of sauce to meat and mix well. 

Baking options:

1) lightly form meat into a long loaf about 8 inches by 3 inches, on an ovenproof casserole dish, or 2" deep baking pan. 

OR

2) lightly press into a 8x4" baking loaf pan. 

Pour remaining sauce over top. 

Cheese variation: Mix in shredded Parmesan or small cubes of mozzarella, and sprinkle cheese on top before baking. 

Bake 60 minutes; meat loaf will have shrunk some from the sides of the baking dish, with an internal temperature (use instant thermometer inserted into middle) should be 150 degrees F.

Wednesday, February 26, 2014

Chicken Tikka Masala


The sauce in this recipe was one of those lick-the-plate kinds for me. It was the perfect blend of rich tomato flavor, spice, and creaminess. Though there is a small amount of prep work involved, the sauce and nut cream can be made a day ahead, so the next day you can have a meal ready in 30 min! (My favorite kind of meal!)

Some notes about the ingredients I used:
I made this recipe with 8 chicken breast tenderloins, which I thought seemed equivalent to 4 chicken breasts at the time, but I ended up with much more sauce than was appropriate for the amount of chicken. Hence, the potatoes. So as you'll see below, I put what was originally listed along with what I did. I had so much sauce that I needed to spread it out by mixing in something else, so I boiled some diced potatoes until they were just tender and mixed those in. (You want the potatoes just soft enough for fork to easily puncture; you don't want them to be super soft, because then they turn to mush when you mix them in). Anyways, potatoes are beside the point of this post. (If you're really interested, if you ask me, I will be happy to explain the potato bit more). Onto the deliciousness of the masala sauce!

Also...
I tagged this as vegetarian and vegan because this could easily be adapted, taking out the chicken and replacing it with vegetables, legumes, seitan, tempeh, or whatever meatless protein or starch you prefer. I am not too familiar with tofu products and seitan, but I'm sure you can find something on the web where it explains how to sauté or otherwise prepare these to be incorporated into a recipe. 


Makes 4 servings

Ingredients:

  • 8 chicken breast tenderloins, cubed  [original: 4 boneless, skinless chicken breasts, cubed*]
  • 2 medium potatoes [original did not call for this]
  • 2 tbsp olive oil

[*If you go with the 4 chicken breasts, don't bother with the potatoes]

Masala sauce:
  • 1/2 cup (4 oz) tomato paste
  • 2 hot cherry chili peppers, deseeded, chopped (2-3 tbsp, or to taste) (these are technically 'medium' hotness, as a reference for substitutions)
  • 3 garlic cloves (1 tbsp minced)
  • 2 inch piece of ginger root, peeled, grated
  • 1 medium yellow onion, chopped
  • 2 tbsp lemon juice
  • 1 tsp ground cumin
  • 1 tsp ground coriander
  • 1 tsp turmeric
  • 2 tsp garam masala (spice blend)
  • 1/4 tsp chipotle chili powder
  • 1/4 tsp sweet paprika
  • 1 tsp honey
  • 1-1/2 tbsp Earth Balance (vegan, non-dairy margarine)
  • 2 tsp dried cilantro OR 2 tbsp finely chopped fresh cilantro
  • 2 tbsp olive oil
Additional/optional garnishes:
  • chopped roasted cashews
  • 2 tbsp finely chopped fresh cilantro
Directions:
  1. Puree masala sauce ingredients, from tomato paste to the olive oil into a food processor. Process until smooth. Set aside.
  2. Heat 2 tbsp olive oil in a large pan (preferably one with a thick bottom for more even cooking) on the stove, medium heat. Cook chicken, stirring to turn over pieces occasionally, for about 5 minutes, until outside is lightly browned.
  3. Increase the heat to medium-high, and mix in the masala sauce. Bring to a low bubble, then reduce heat to simmer for 10-15 minutes, or until chicken is cooked through. If sauce gets too dry, add a little water. Stir often to avoid burning the sauce on the bottom. 
  4. When chicken has cooked through, mix in the cashew cream, and cook through on low for several more minutes. 
  5. Serve hot with rice or vegetables. Optional: Sprinkle with chopped cashews and/or cilantro.

I have only skimmed the cookbook that has the original recipe, but I bought it as an ebook and even though it's a small book, it's full of recipes that actually seem doable, not full of complicated ingredients, techniques, etc. as some special dietary (gluten-free) cooking sometimes appears. And they all look delicious, of course, too!

Source:
Cheetham, G. (2011). Simply gluten-free & dairy-free: Breakfasts, lunches, treats, dinners, desserts. London, U.K: Duncan Baird Publishers.


Monday, February 24, 2014

Cashew Nut Cream

I used this recipe to make the Vanilla Cashew Cream variation, for my strawberry muffins, but it can be a neutral creamy base for many other ideas. I think it tastes just like regular dairy cream, only thicker. It is not heavy like a nut butter; it's surprisingly light, and has that creamy richness of dairy cream. Using different herb/spice blends, you could probably make this into a variety of different vegan 'cream' sauces. I made this to be used later in a chicken tikka masala recipe, but since I couldn't wait to eat some, I mixed some up with a little vanilla and stevia, to make my breakfast muffin extra special.


Basically all you have to do is soak raw cashews in cold water over night, and then in the morning, drain & rinse them. Then purée them in the food processor with some water until it completely smooth. It's that easy! 


Cashew Nut Cream
Makes about 2 cups 

1.5 cups raw cashews*
3/4 cup cold water

1. Put cashews in a bowl and fill with enough cold water to cover them. Cover and let soak overnight/12 hrs.
2. Drain and rinse cashews. Add to food processor. Start running processor, and slowly stream in 3/4 cup cold water. Continue to purée until smooth, periodically stopping to scrape down sides as necessary. 

*Depending on the recipe you want to use this for, you could sub in roasted cashews, but I would suggest not using salted ones  

Vanilla variation:
For 1 big dollop

1.5 tbsp cashew nut cream
1/4 tsp vanilla extract
1/4 tsp stevia


Recipes using Cashew Nut Cream:

Strawberry Chia Seed Muffins
Chicken Tikka Masala (coming soon)


Sunday, February 23, 2014

Pineapple-Ginger Marinade & Broiled Salmon

Broiled salmon filets with marinade semi-reduction
Yum. What is great about this is that the citrus and sweet flavors mask any hint of fishiness that might have been without the marinade. I’m fairly new to liking seafood, and still really only tolerate the freshest, non-fishy fish like halibut, sole, and tilapia. I have been wanting to love salmon too, and hadn’t really found any preparation I liked, other than those in which the salmon is swimming in some kind of teriyaki sauce.

From The New AHA Cookbook.

Ingredients:

  • 6 oz pineapple juice
  • 1/2 cup diced onion
  • 2 tbsp lime juice
  • 1 tsp ground ginger
  • 1 tbsp reduced-sodium tamari
  • 2 cloves minced garlic
  • 1/2 tsp sesame hot chili oil 
  • 1 tsp canola oil

Marinate the salmon filets (makes enough for about three 4-oz filets) in the mixture for 30 minutes. To cook the filets, spray the broiling pan will cooking oil. Broil them about 5 inches from the broiler, for 5-6 min on each side. While the filets are cooking, transfer the marinade mixture to a sauce pot, and heat on medium high. Bring to a boil, and cook on a low-boil for about 10 min, or until it has thickened slightly and reduced. Pour over the finished filets when serving.
Broiled salmon with steamed vegetables and lemon-thyme rice

Jambalaya with Shrimp and Andouille Sausage


Adapted from a Cooking Light recipe.
Makes about 2 quarts


1 tbsp extra virgin olive oil
1 cup chopped onion
1 cup chopped red bell pepper
1 tbsp minced garlic
6 oz andouille sausage, sliced
1 cup uncooked brown rice
1 tsp sweet paprika
1/4 tsp black pepper
1 tsp marjoram
1 tbsp apple cider vinegar
1 tsp dried oregano
1 tsp onion powder
3/4 tsp thyme
1/2 tsp garlic powder
2 bay leaves
2 cups fat free low sodium chicken broth
1-1/4 cups water
1 tbsp tomato paste
1/2 tsp hot pepper sauce (I like Franks Red Hot)
14.5 oz can no-salt diced tomatoes
1/2 lb. peeled, deveined shrimp
1 tbsp dried parsley 

Directions:

Sauté sausage in large Dutch oven Until browned. Remove from pot and set aside, and add olive oil to heat  over medium heat. Add onions and bell pepper and cook for about 5-10 min or until tender and lightly browned. Add garlic and spices, stir, and cook about a minute. 
Add rice, water, broth, tomato paste, and other remaining ingredients. Bring just to a boil, then cover and reduce heat to simmer for 40 min. or until rice is cooked. Add shrimp and cook for 5 min or until pink and no longer translucent. 
Discard bay leaves before serving. 

Another option with the shrimp is to get already cooked shrimp and just toss them in at the end, heat through, and then serve. 

Original recipe found here:
http://www.myrecipes.com/m/recipe/jambalaya-with-shrimp-andouille-sausage-10000001041904/


Strawberry chia seed muffins


Oooh these were really yummy. Many gluten-free recipes I come across seem to have a whole lot of sugar added to them, and thankfully, when I came across the one that inspired this, I had to try it out, since it didn't add too much. Of course, since my cooking and baking tends to be spontaneous and I rarely plan ahead, I have to adapt things to whatever I have already at home. So my recipe actually has even less grams of sugar, because I used a zero-calorie stevia sweetener. Some of the other main things I adapted: I didn't have oat flour, so I ground up some rolled oats instead, and I swapped out the tapioca starch the original recipe called for for potato starch. I also added chia seeds to pack in more nutrients, which is the most likely reason I needed to use nearly twice as much milk in my recipe, because they soak up a lot of the liquid.

Anyway, I thought they turned out great, and I like that they are only lightly sweet, and filling enough with their fiber content to satisfy me (I ate two, since they are kind of little). They will be perfect to freeze and have a nice take-along breakfast or snack!

Adapted from Gluten-free Strawberry Whole Grain Muffins by Gluten-free Goddess

Makes about 17 muffins

Dry ingredients:

1/2 cup fine almond meal or almond flour
1/2 cup sorghum flour
3/4 cup rolled oats
1/2 cup coconut flour
1 tbsp potato starch
2 tbsp light brown sugar
2 tsp baking powder
2 tbsp chia seeds
1/2 tsp salt
1/8 to 1/4 tsp ground nutmeg

Wet ingredients:

Egg substitute:
2 tbsp flaxseed meal + 6 tbsp hot water 
1/4 cup canola oil
1/4 cup honey
1/4 cup Truvia or other zero-calorie granulated baking sweetener with Stevia
1 tsp almond extract 
1-1/2 cup flax milk (or your preferred non-dairy milk) 
1-1/2 cup chopped strawberries, thawed from frozen or fresh 
Optional: 1/4 cup slivered almonds 

Directions:

Preheat the oven to 350 degrees (F). Line cupcake tins with 18 paper liners and spray the liners lightly with cooking spray.

Combine all the dry ingredients except the oats in a large bowl.
Grind oats in food processor to make about 1/2 cup medium-coarse ground flour. Add to dry ingredients. Whisk ingredients together well.

Make the egg substitute in a small bowl and let it sit for about 2 min. Add this to the other wet ingredients, except for the milk and strawberries. Add this mixture to dry ingredients. Add about half of the milk, and mix ingredients well. If the batter is too thick, keep adding milk until you get a semi-thick muffin-like batter. It should not be soupy like pancake batter though.

Gently fold in the strawberries. Fill the muffin liners to the top (about 1/3 cup each).
Optional: sprinkle slivered almonds on top of muffins before baking.

Bake for about 35-40 min.
Let cool in pans for about 5 minutes, then place muffins on cooling racks.

Once they are completely cooled, you can put them on a baking sheet, cover, and put them in the freezer to keep them fresh for later. (once they are frozen, you can pile 'em back up in a freezer bag or container to save space, but initially they need to be spaced out like this for even freezing)

Nutritional data from MyFitnessPal.com for 1 muffin (of 17 muffins):
149 kcal
7 g fat
3 g protein
22 g carbohydrate
4 g fiber
6 g sugar

Here is a shot of a muffin with sinfully-delicious-yet-guilt-free cashew nut cream (see post):


Friday, February 21, 2014

Peach-blueberry ice cream pie


I know this is rather out of season, but I was going through my recipe book, and this one was too yummy not to post here.

This stuff is just heavenly. Sweet and a little spicy, it is the perfect treat to pull out of the freezer on a hot summer day. Or, if you just gotta have some ice cream whenever… Maybe fireside in the winter, so you don't freeze?!

This is one of those do-ahead desserts. It's easy prep-work; most of the time it takes to make this is just waiting for things to cool and freeze.

If you can find TruWhip, you can sub-it in for the fresh whipped cream. It is more stable and lower calories/fat. It's a non-dairy whipped topping that doesn't use nasty hydrogenated oils that most other nondairy whipped toppings do (like CoolWhip). It does contain a tiny bit of sodium caseinate (a milk protein), so it's not entirely vegan, but apart from that it is a great "nearly vegan" tasty topping.

I made this gluten-free by using Mi-Del gluten-free gingersnaps, but you could use any kind of good gingersnaps.

ALSO, if you chop up some extra crystallized ginger and mix it into the ice cream, you'll get an even more yummy pie.


This pie makes 8 servings.
It can be made up to 2 days ahead.

Ingredients:

  • 6 ounces Mi-Del gluten-free gingersnap cookies
  • 2 tablespoons softened Earth Balance or coconut oil, melted (or use any non-hydrogenated, vegan margarine)
  • 1 tablespoon So-Delicious French Vanilla Coconut Milk Non-dairy Creamer
  • 2 cups fresh blueberries, divided
  • 1/3 cup sugar
  • 1/4 cup fresh lemon juice
  • 1 pint peach ice cream, softened in refrigerator for 20 minutes*
  • 2 cups TruWhip All-natural whipped topping
  • ¼ cup + 2 tbsp chopped crystallized ginger
*Originally I used Alden’s organic peach ice cream (so good!), but if I want to make this dairy-free, I would substitute this for coconut milk ice cream, and mix in about ¼-⅓ cup of pureed peaches (or more or less, depending on how peachy you want it, I guess! Too much though would change the texture of the ice cream and make the pie too hard when it re-freezes). One little snack cup of peaches in juice could be an easy way to do this.

Here's how to assemble this ridiculously yummy pie:

First, grind up the cookies in a food processor until you get a fine crumb without any big chunks. You should have about 1-⅓ cups of ground up cookies when you’re done.

Put the cookie crumbs into a medium-sized bowl, and add the margarine and creamer. Mix well. Press the mixture firmly onto the bottom and sides of a 9-inch pie dish. Then pop it in the freezer for about 30 minutes, so it can firm up.

Toss 1-3/4 cups of the blueberries plus sugar and lemon juice in another bowl, and set this aside for about an hour at room temperature, for the flavors to marry.

Next, transfer the blueberry mixture to a heavy-bottomed pot, and cook on medium heat, for about 10-15 minutes. This will soften the berries and release their juices. 

Strain the berries through a fine-mesh strainer, over a medium bowl. Reserve the berries and juice in separate bowls, cover, and chill.

When everything is nice and cold: In a bowl, gently fold the blueberries into the softened ice cream. This is also where you can mix in a couple tablespoons of the crystallized ginger, if you want. Spread the ice cream into the crust, and smooth out the top. Next, spread the whipped topping evenly over the top, and then sprinkle with the remaining blueberries and crystallized ginger. 

The reserved blueberry juice is meant to be drizzled over the pie when you serve it, but this is optional. 

Finally, put the the pie back into the freezer to firm up, about 6 hours or overnight. (You'll want to put the pie into something that you can cover it in a way that won't smush the top.)

Just before you're ready to serve it, put the pie in the refrigerator for 10-15 min, or until it has softened just enough to slice. At this time, you might want to cut the whole pie, and make it a little easier to get out single servings (so you don't have to soften the whole pie next time you want a piece!).